Introduction
Markdown was created by John Gruber and Aaron Swartz who contributed on the syntax.
Nowadays Markdown is everywhere, from readme files and writing messages in online discussion forums. I'm even writing this very article in Markdown as well!
Markdown widely used as it offers an easy to write and read plain text format, which then gets converted to HTML.
In this tutorial, I will show you how to use Markdown with your Voyager Admin panel for your Laravel website and how to render the output to HTML on your views!
Prerequisites
Before you start you would need to have a composer and Laravel application up and running along with Voyager installed.
I will be using a DigitalOcean Ubuntu Droplet for this demo, if you wish you can use my affiliate code to get free $100 DigitalOcean credit to spin up your own servers!
If you do not have that yet, you can follow the steps from this tutorial on how to do that:
Or you could use this awesome script to do the installation:
Once you have Laravel and Voyager installed, you are ready to follow along!
Install the Laravel Markdown Package
For this example, we will use the following Laravel Markdown package developed by Graham Campbell:
https://github.com/GrahamCampbell/Laravel-Markdown
In order to install the package, first cd into the directory of your Laravel application and run the following command:
composer require graham-campbell/markdown
This might take a minute or so to complete.
After that, as stated in the GitHub Readme file, in case that you are not using automatic package discovery, you have to register the GrahamCampbell\Markdown\MarkdownServiceProvider service provider in your config/app.php.
You can also optionally alias our facade:
'Markdown' => GrahamCampbell\Markdown\Facades\Markdown::class,
The package also supports different configurations which you could learn more about here. To keep things simple, we will stick with the default settings.
Configure your Controller
Once you have the package installed, we are ready to change our Post controller and include the MArkdown facade.
To do so, edit your PostController and add the following line at the top:
use GrahamCampbell\Markdown\Facades\Markdown;
As an example, my single post method looks like this:
    public function single($slug){
        $post = Post::where([['slug', '=', $slug],['status', '=' ,'published']] )->firstOrFail();

      return view('blog.single', compact('post'));

    }
In order to incorporate the Markdown changes, you just need to add the following line:
$post->body = Markdown::convertToHtml($post->body);
So your method would look something like this:
    public function single($slug){
        $post = Post::where([['slug', '=', $slug],['status', '=' ,'published']] )->firstOrFail();

      $post->body = Markdown::convertToHtml($post->body);

      return view('blog.single', compact('post'));

    }
All that we had to do was to first include the Markdown facade and then use the convertToHtml static method to parse our Markdown to HTML and return this to our Post view.
Change the Input type in Voyager
Now that we have our controller configured to parse markdown to HTML, we need to make sure that we actually, store our posts as markdown in our database.
Luckily Voyager makes that super easy! All you need to do is:
- First, go to your Voyager admin panel
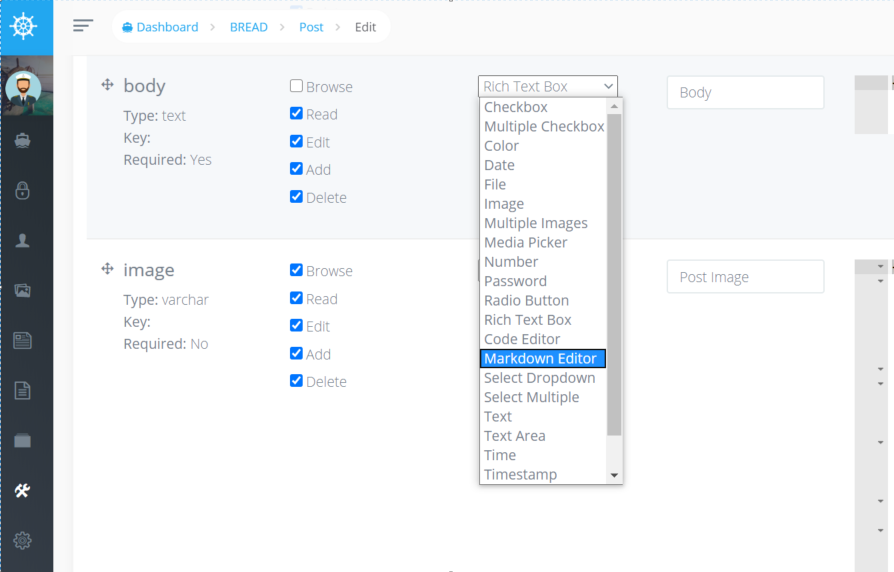
- Then go to Tools -> BREAD
- Find your Posts table and click edit
- Then search for
bodyand from the dropdown change input type fromRick text boxtoMarkdown Editorand then save the changes

Once this has been done, go to Posts and edit or add a new post.
That way you will be able to write in Markdown via your Voyager control panel and have your markdown parsed to HTML on your frontend!
Conclusion
Now you know how to use Voyager's Markdown Editor and write your posts in Markdown directly via Voyager!
Hope that you find this helpful!


